Making the DenMotion end card
An animated sign-off for the films. Corner brackets drawing themselves, a wordmark pulling into focus, and the reason none of it was built in Premiere.
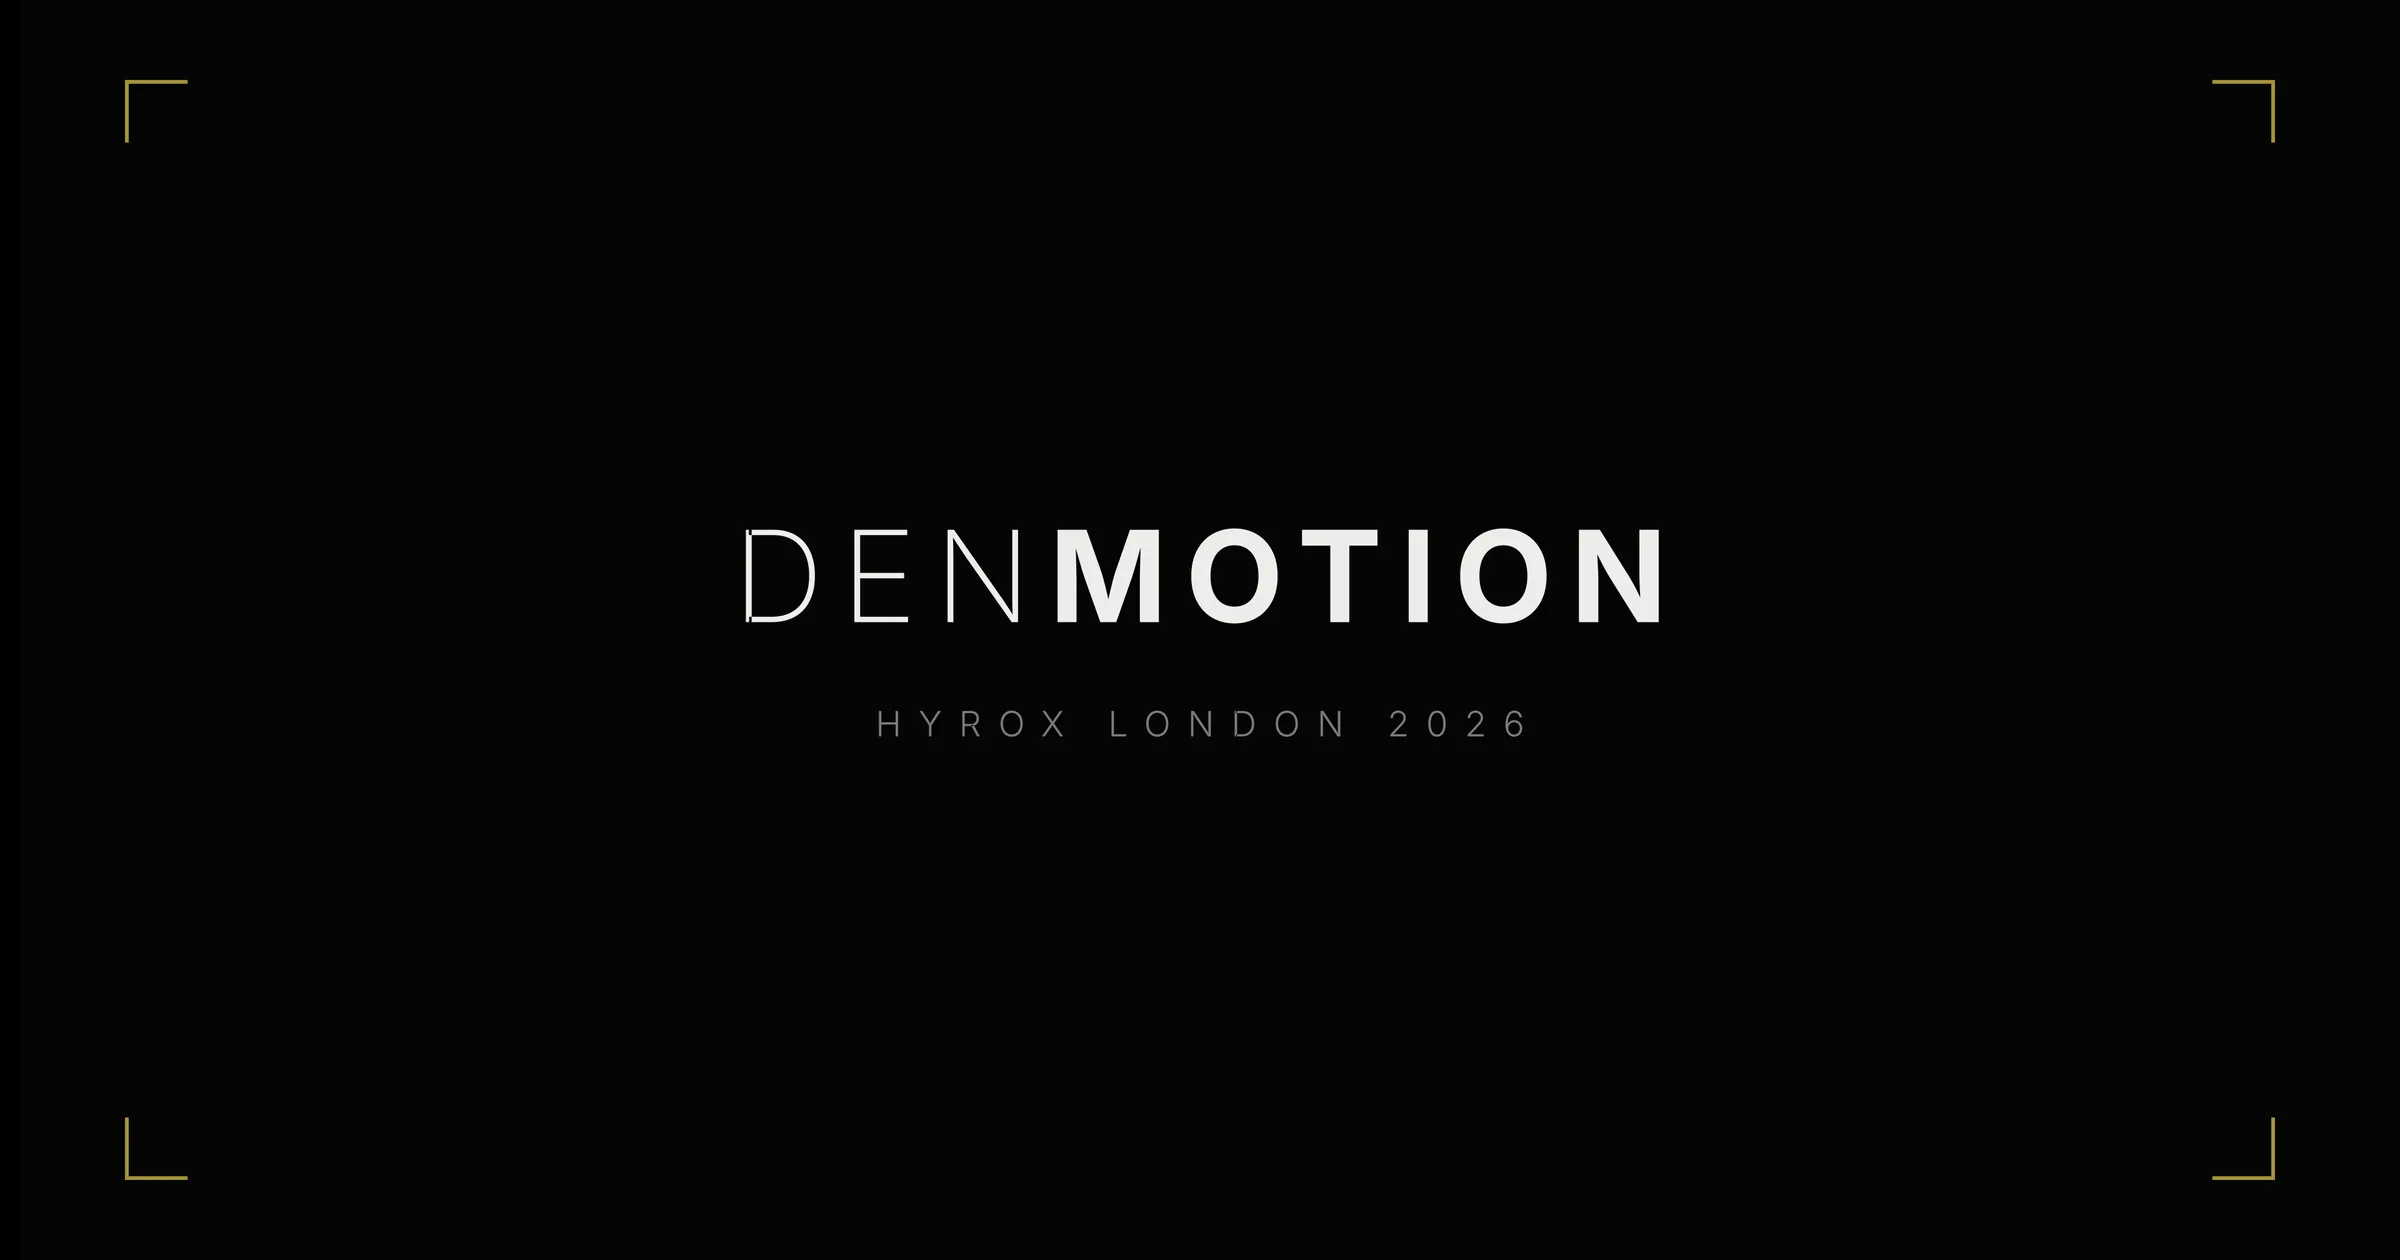
An end card is the frame at the end of a film that says who made it. It comes up after the last shot, holds for a few seconds, and shows the name and nothing else.
I built one so the films have the brand on them the way everything else does.
The logo set had everything needed to build one. The wordmark with its tracking, the corner brackets, the ground colour and the clearances were all specified and sitting in one Illustrator file. What it didn’t have was a version that moves.
- A 4K end card built from the existing artwork rather than redrawn
- Corner brackets that draw themselves in
- A wordmark that pulls into focus rather than fading up
- Alpha that survives into the edit, so it works over footage as well as after it
- A rule for when a title card is right and when it isn’t
The tools
Four applications handle this between them, and each one does the thing it’s actually for.
flowchart LR
  A["Illustrator<br/>the artwork"] -->|Overlord| B["After Effects<br/>the animation"]
  B -->|Dynamic Link| C["Premiere<br/>the edit"]
Illustrator holds the artwork, because it already does. The identity file has the wordmark with its tracking, its weight step and the trailing-character correction, and rebuilding any of that somewhere else means rebuilding the mistakes too.
Overlord is a plugin that sends paths straight from Illustrator into After Effects as native shape layers, so nothing gets exported, nothing gets imported, and no intermediate file exists at any point.
After Effects does the animation.
Premiere does the edit and nothing else.
I learned After Effects years ago and I still use it, just not often. It came out last year for the odd gym video and hasn’t been open much since. I like the application, and the reason I don’t reach for it more is that it takes far longer than any other part of an edit.
Now, the card was quicker and easier than I expected, because the time I put into the fundamentals is still there. Trim paths, keyframes and the graph editor all work the way they always did, so none of it needed relearning, and Overlord meant the artwork arrived without an export step in front of it. The whole card took an evening.
The Premiere problem
I tried building the card in Premiere first, since that’s where the edit lives and it has a titling tool.
Essential Graphics has no proper tracking control. It has a slider with no numeric field, which means there is no way to set tracking to exactly 150, and no way at all to select the final character and set its tracking to zero. That correction is what stops every centred line in this identity sitting slightly left of true centre.
Positioning is drag and nudge rather than typed coordinates, so the wordmark sits wherever it looks about right.
Both of those are fine for a lower third that appears once. They are not fine for a mark that has to be the same every time it appears anywhere.
So the card gets built where the artwork already is.
The artboard
The card is its own artboard in the identity file, 3840 by 2160, named 09 - end-card.
| Element | Value |
|---|---|
| Ground | 3840 by 2160, #050505 |
| Wordmark | 1550px wide, centred |
| Corner ticks | 100 by 100px, 6px stroke, 200px inset |
| Project line | 44px, tracking 200, muted |
The card uses two colours. #050505 is the near-black the brand uses as a ground everywhere, and the wordmark sits on it in #EDEDEA, an off-white rather than a pure white.
The wordmark came straight from the lockup artboard. The ticks did not.
The ticks
Scaling the icon version up would have been quicker and wrong. The corner brackets on a 512 pixel icon run at 3pt. Multiply that by the 7.5 times difference in canvas size and you get a 22pt stroke with 480 pixel arms, which is a completely different object.
That’s the same rule as every other place these brackets appear. The stroke does not scale with the artwork. It gets proportionally heavier as the canvas gets smaller, and proportionally lighter as it grows, so each canvas gets its own numbers.
| Canvas | Stroke | Arms | Inset |
|---|---|---|---|
| 512px icon | 3pt | 64px | 56px |
| 85 by 55mm card | 1pt | 5mm | 5mm |
| 3840 by 2160 end card | 6px | 100px | 200px |
The 200 pixel inset is 5.2 percent in from each edge, which keeps the brackets inside the action-safe area so nothing gets clipped on a display that overscans.
The animation
The animation is two moves in sequence, running at 25 frames per second.
| Frames | What happens |
|---|---|
| 0 to 12 | Black. Nothing on screen |
| 12 to 36 | Four brackets draw themselves in, staggered three frames apart |
| 45 to 60 | Wordmark pulls into focus |
| 58 to 70 | Project line follows |
| 70 to 125 | Hold |
The finished card, 125 frames at 25 frames per second. Brackets from frame 12, wordmark from 45, project line from 58, then a hold to the end.
The nine frame gap between the brackets finishing and the wordmark starting is the part that does the work. The frame arrives, settles for a third of a second, then what’s inside it appears. Overlap those two and it reads as one busy move instead of two deliberate ones.
The brackets
Each tick is a shape layer with Trim Paths added, animating End from 0 to 100 percent over 15 frames. Both keys get Easy Ease, then the influence is dragged out in the graph editor so the move starts fast and settles rather than easing at both ends. A mechanical thing snaps out and glides in.
The four are staggered three frames apart, across the top row first and then the bottom.
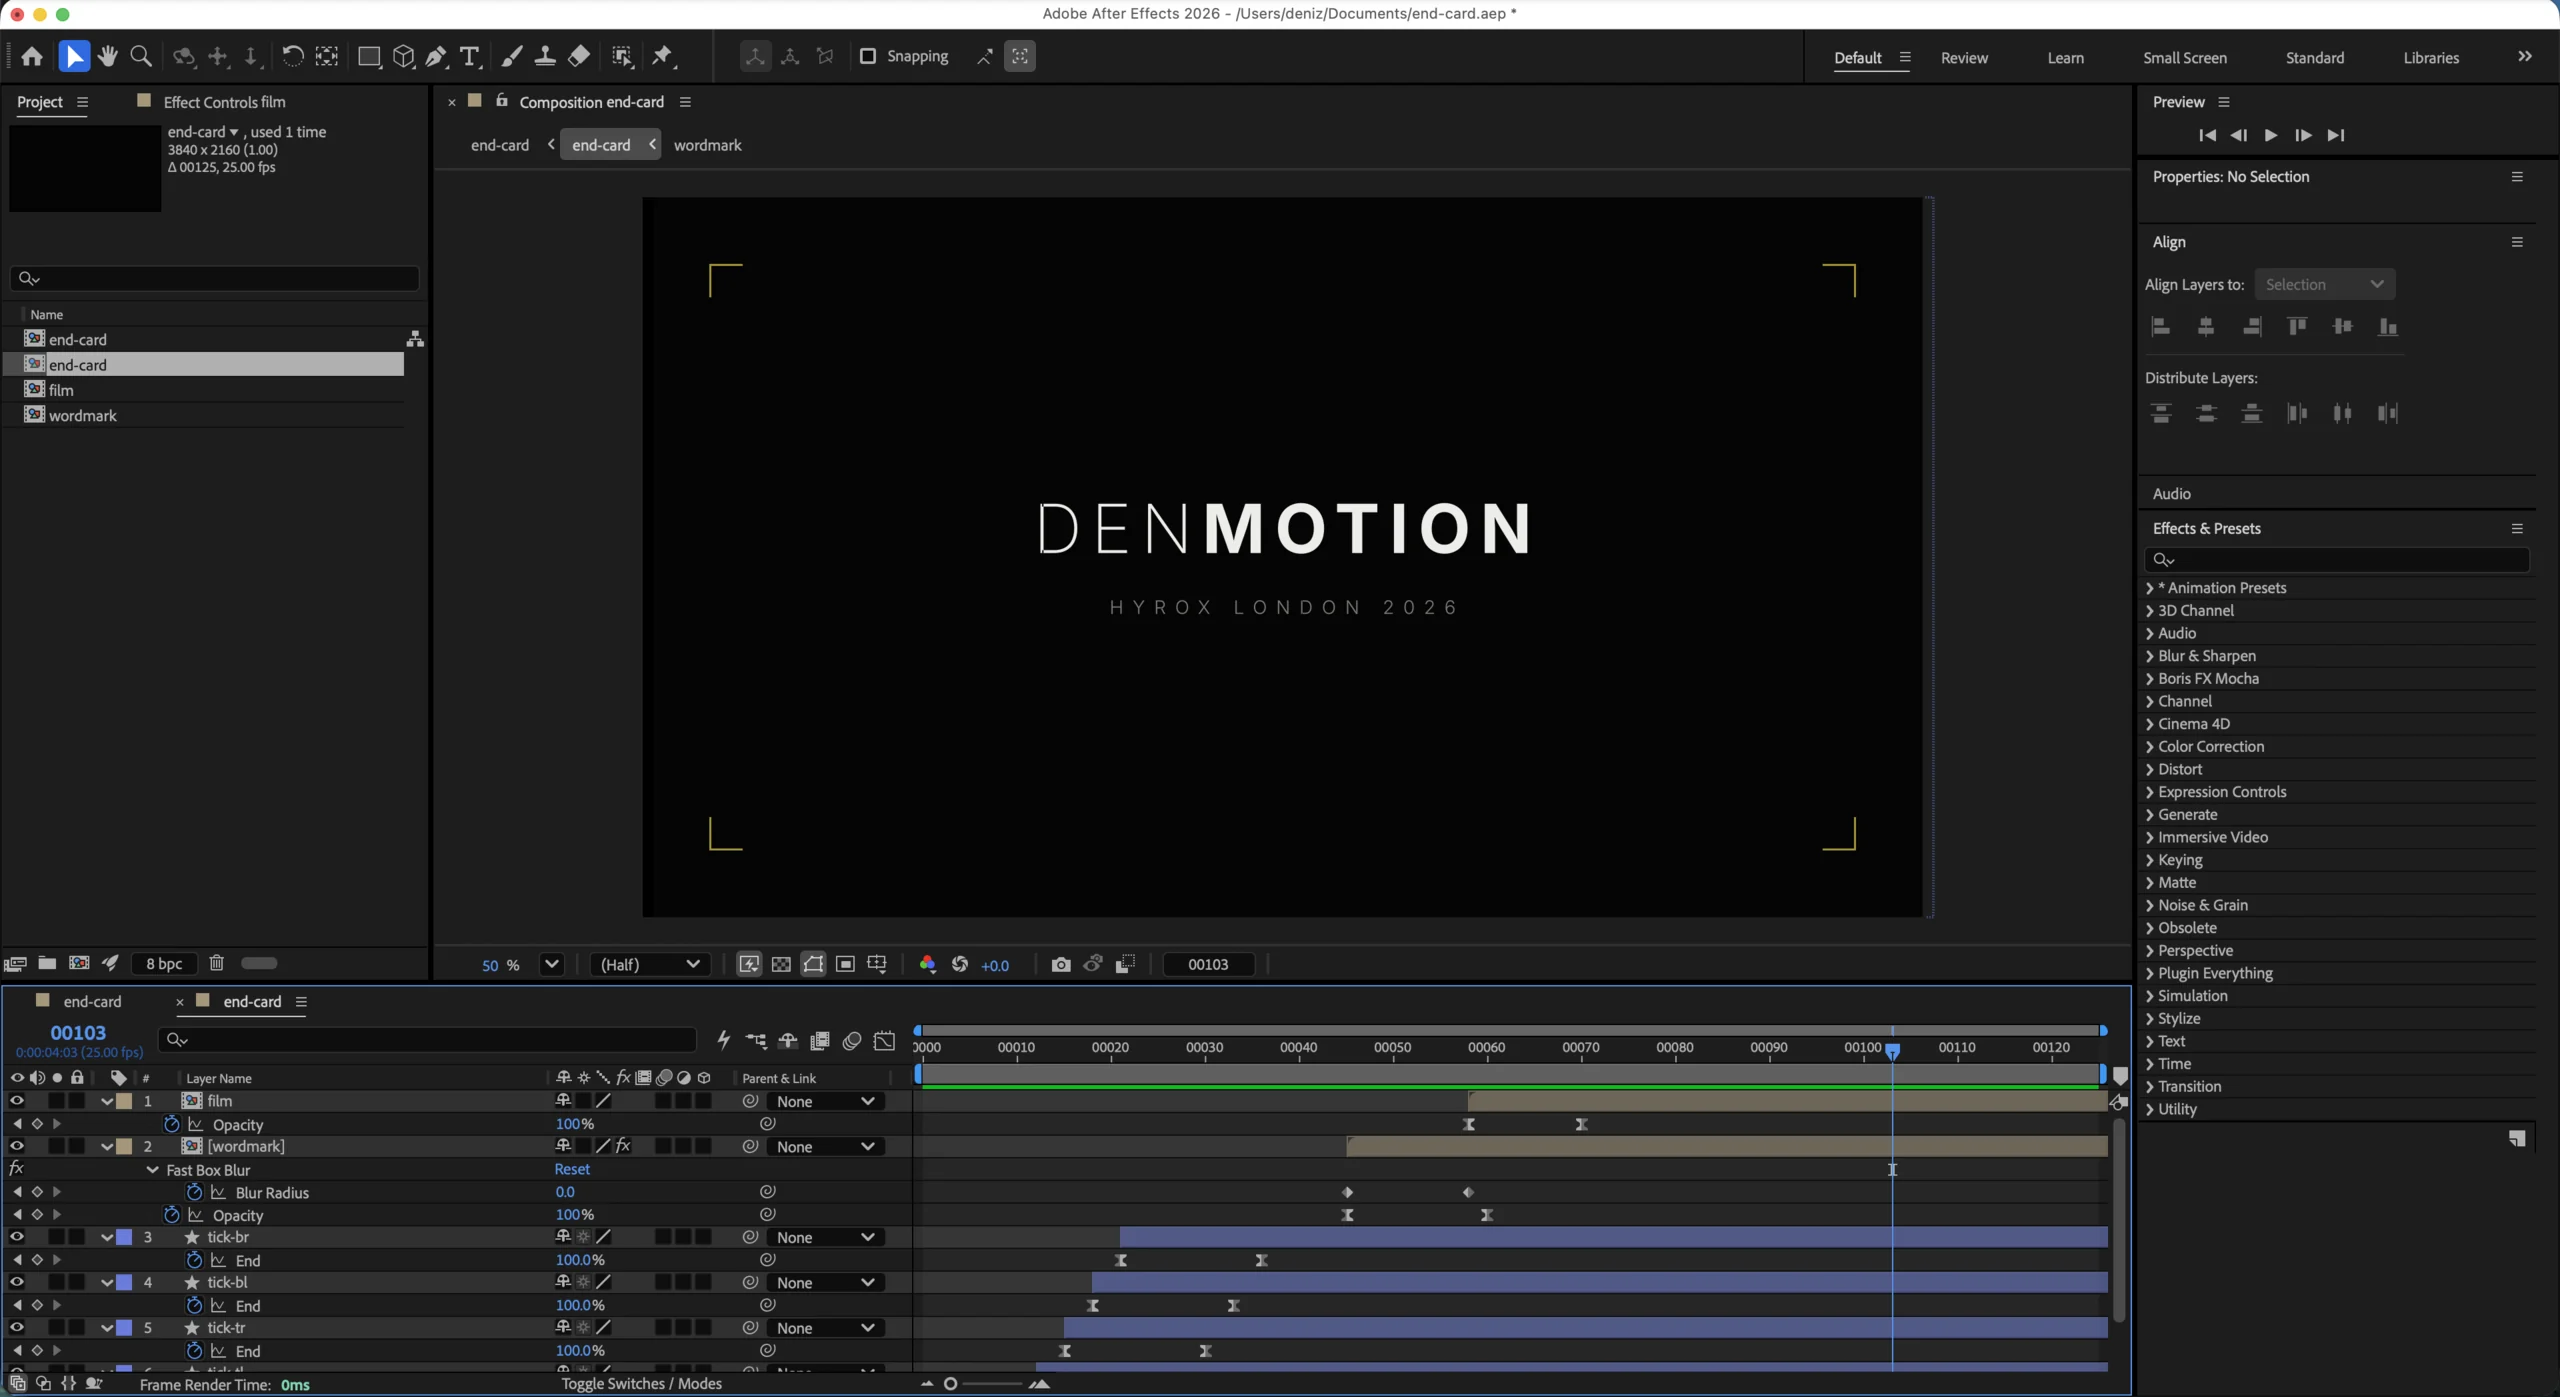 The
The end-card composition at 3840 by 2160 over 125 frames. Each tick is its own shape layer with End keyframed under Trim Paths, and the wordmark above them has the Fast Box Blur on it, with Blur Radius and Opacity keyframed across the same frames.
The brackets are crop marks, so drawing them onto the frame is what they already do. It isn’t decoration bolted onto a static logo, it’s the thing the logo is a picture of.
The wordmark
The wordmark goes from 0 to 100 opacity over 15 frames, with a Fast Box Blur running from 40 to 0 across the same frames.
That’s a focus pull. It’s the one move a film and photography brand actually owns, and it means every part of the animation is saying the same thing. The viewfinder finds the frame, then the subject comes into focus inside it.
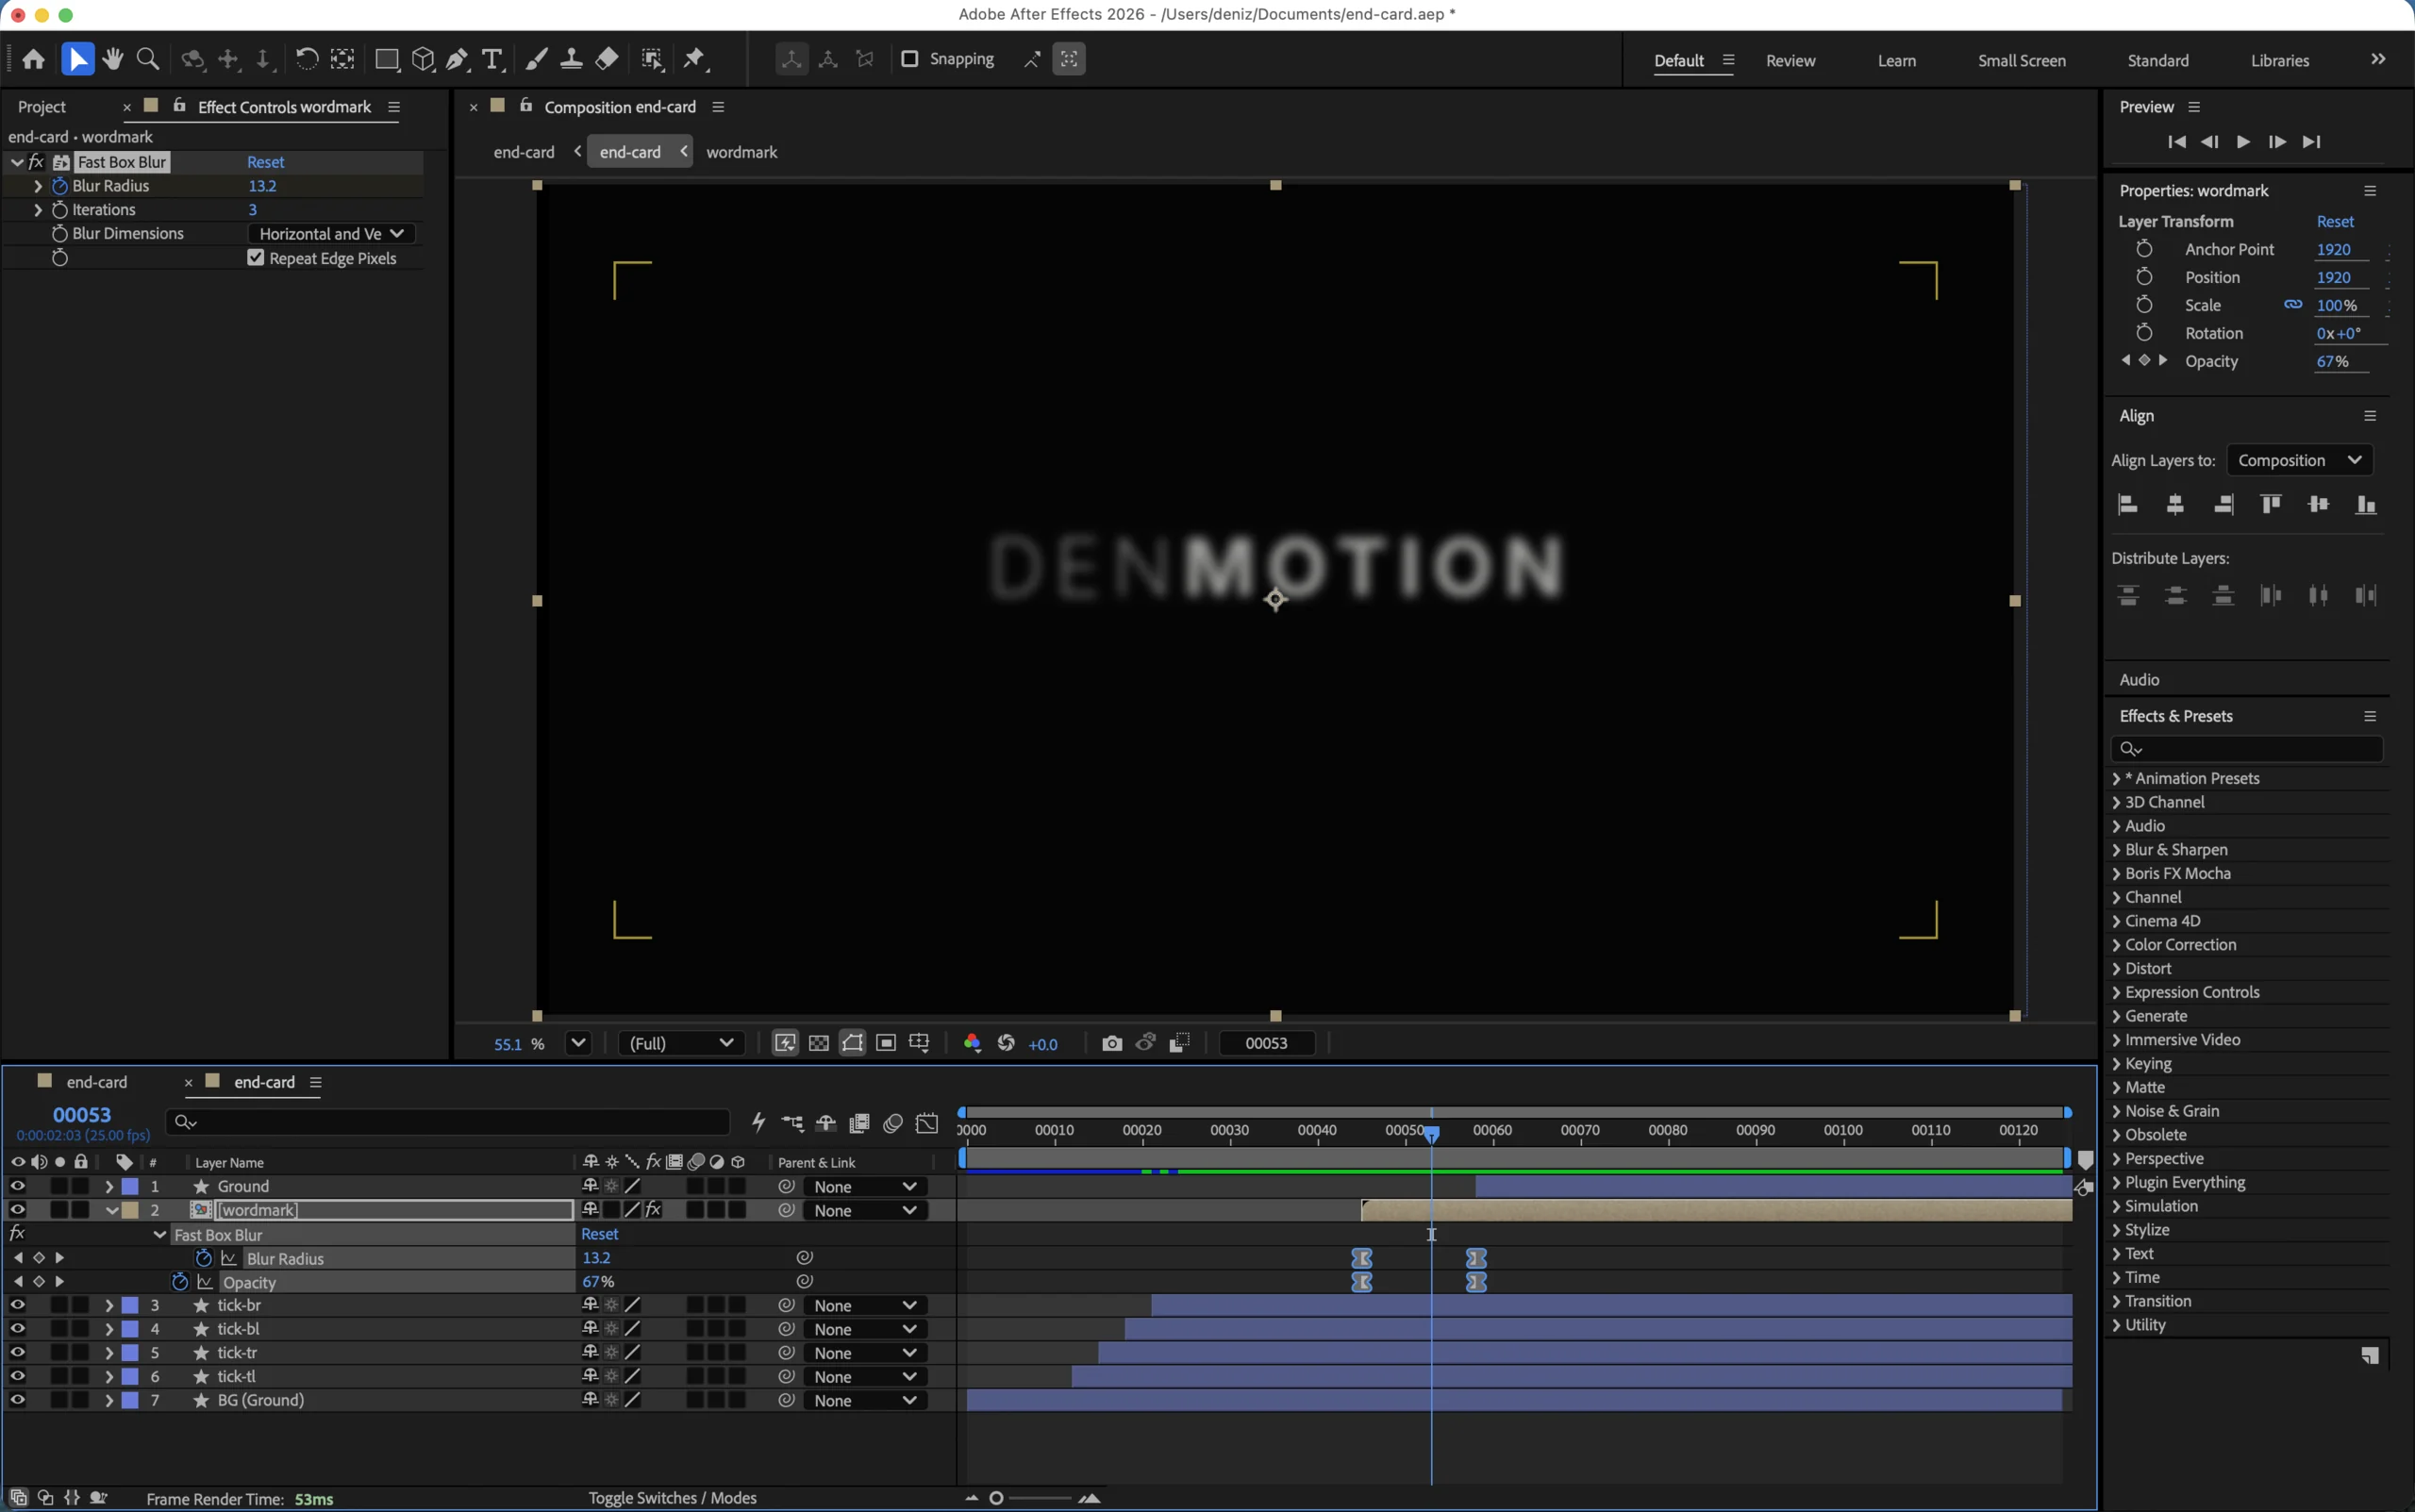 Frame 53, with Blur Radius at 13.2 on its way from 40 to 0. Iterations sits at 3, and Repeat Edge Pixels is ticked so the blur doesn’t soften against the layer boundary.
The project line
HYROX LONDON 2026 sits under the wordmark, which is the event, the city and the year.
It’s the only thing on the card that changes. The wordmark says who made the film and this line says which film it is, so signing the next one means retyping the bottom line and leaving everything above it alone.
Three things hold it under the wordmark rather than beside it. It runs at 44px, its tracking is 200 against the wordmark’s 150, and it’s a muted grey rather than #EDEDEA. Wider letter-spacing on a smaller line in a weaker colour reads as a caption, which is the same relationship the tagline has to the wordmark in the lockup.
It starts at frame 58, two frames before the wordmark has finished resolving, so it arrives on the tail of the focus pull rather than after it. The brackets and the wordmark are two moves. The wordmark and the project line are one.
The open
The end card handles the close. The open is a different problem, and at the moment it doesn’t use a card at all.
I put the type straight over the opening shot with the same focus pull, and it works because the shots have been dark enough to hold off-white type. The film starts straight away. A front card would take the first two seconds instead, which is fine on a client deliverable or something embedded on a site, and bad on Instagram or TikTok where those two seconds decide whether anybody keeps watching.
The overlay fails when the shot is bright. It failed over a HYROX gym floor, and it fails the same way on any bright venue. The brand has no drop shadow and no scrim, so the fix is choosing a darker shot or moving the type, and when neither of those is available the answer is a front card.
I haven’t built one. It doesn’t need building in advance, because it comes out of the end card composition with two changes. The brackets come off, and the title goes in where the wordmark was.
The brackets are the change that has to happen. They close on the frame, which is an ending rather than a beginning, and the brand’s own rule says they work on single objects and turn to noise when they repeat. Use them twice in one film and neither one means anything.
That leaves the same ground with the title centred and nothing else, running the same focus pull for about three seconds rather than five. The title comes from Illustrator each time rather than being typed in After Effects, for the same reason the wordmark does. It’s tracked at 300 with the final character set back to zero, then sent across with Overlord.
The front card names the film. The end card signs it.
The link
The composition never gets rendered. Premiere imports the After Effects project file itself, which is Dynamic Link, and the comp arrives on the timeline as a clip reading from the live project.
Change a keyframe in After Effects and the timeline updates. There’s no export to repeat every time something moves, no intermediate file to keep track of, and no copy of the card sitting on disk that’s quietly older than the one in the project.
Alpha comes through without being asked for. A rendered file needs a codec that keeps it, Apple ProRes 4444 rather than 422, and choosing wrong gives you a black rectangle where you expected a transparent one with no warning that anything went wrong. Dynamic Link never puts the question.
That gives two comps rather than two files. One has the ground layer on for a standalone card, and the other has it off for laying over footage.
The cut
The film ends on the last shot and hard cuts to the card.
There’s no cross dissolve. The card already opens on twelve frames of black, so the pause a dissolve would provide is built in, and cutting to it means the brackets never draw over a half transparent ghost of the previous shot.
The fade out stays in Premiere rather than being baked into the comp, so the card can be held for as long as each film needs.
flowchart LR
  A["Last shot"] -->|hard cut| B["12 frames black"]
  B --> C["Brackets draw"]
  C --> D["Wordmark comes in"]
  D --> E["Hold"]
  E -->|dip to black| F["End"]
The whole card comes out of one artboard with four shape layers on it, two keyframed properties and five seconds of timeline. The brackets take twenty four frames, the wordmark takes fifteen, and the rest of it is holding still.
The films are signed now.