Filming HYROX at Olympia London
First time filming a client at an indoor fitness event. What I set, what I got wrong, and what I learned about shooting action in bad light.
Introduction
This was different from Bodrum. In Bodrum I was filming places. The subject was still, the light was abundant, and I had all the time I wanted. HYROX at Olympia London was the opposite. The subject was Fabio, a client racing Open division. He was moving constantly through eight stations and eight 1km runs. The light was poor. I had 1.5 hours. And I had never filmed someone else’s event before.
I went in with a plan. Three camera presets saved: 25fps station work, 50fps slow motion, and a photo preset for stills. White balance tested on arrival. Touch tracking to lock onto Fabio in the crowd. A tripod for the balcony shots and handheld for the floor.
The plan survived about 10 minutes. The lighting was worse than expected. The kit lens could not gather enough light for the shutter speeds I needed. Touch tracking struggled in a crowd of hundreds of athletes. The tripod worked but made me immobile when I needed to move between stations. Every problem I solved created a new one.
The footage still came out good, and Fabio was happy. I learned alot from this 1.5 hours of indoor event shooting. This post documents everything, from the settings to the mistakes to the edit in Premiere Pro.
What this post is
A learning journal for filming a live indoor fitness event. Same approach as the Bodrum video post. Every setting, every decision, every problem documented as it happened.
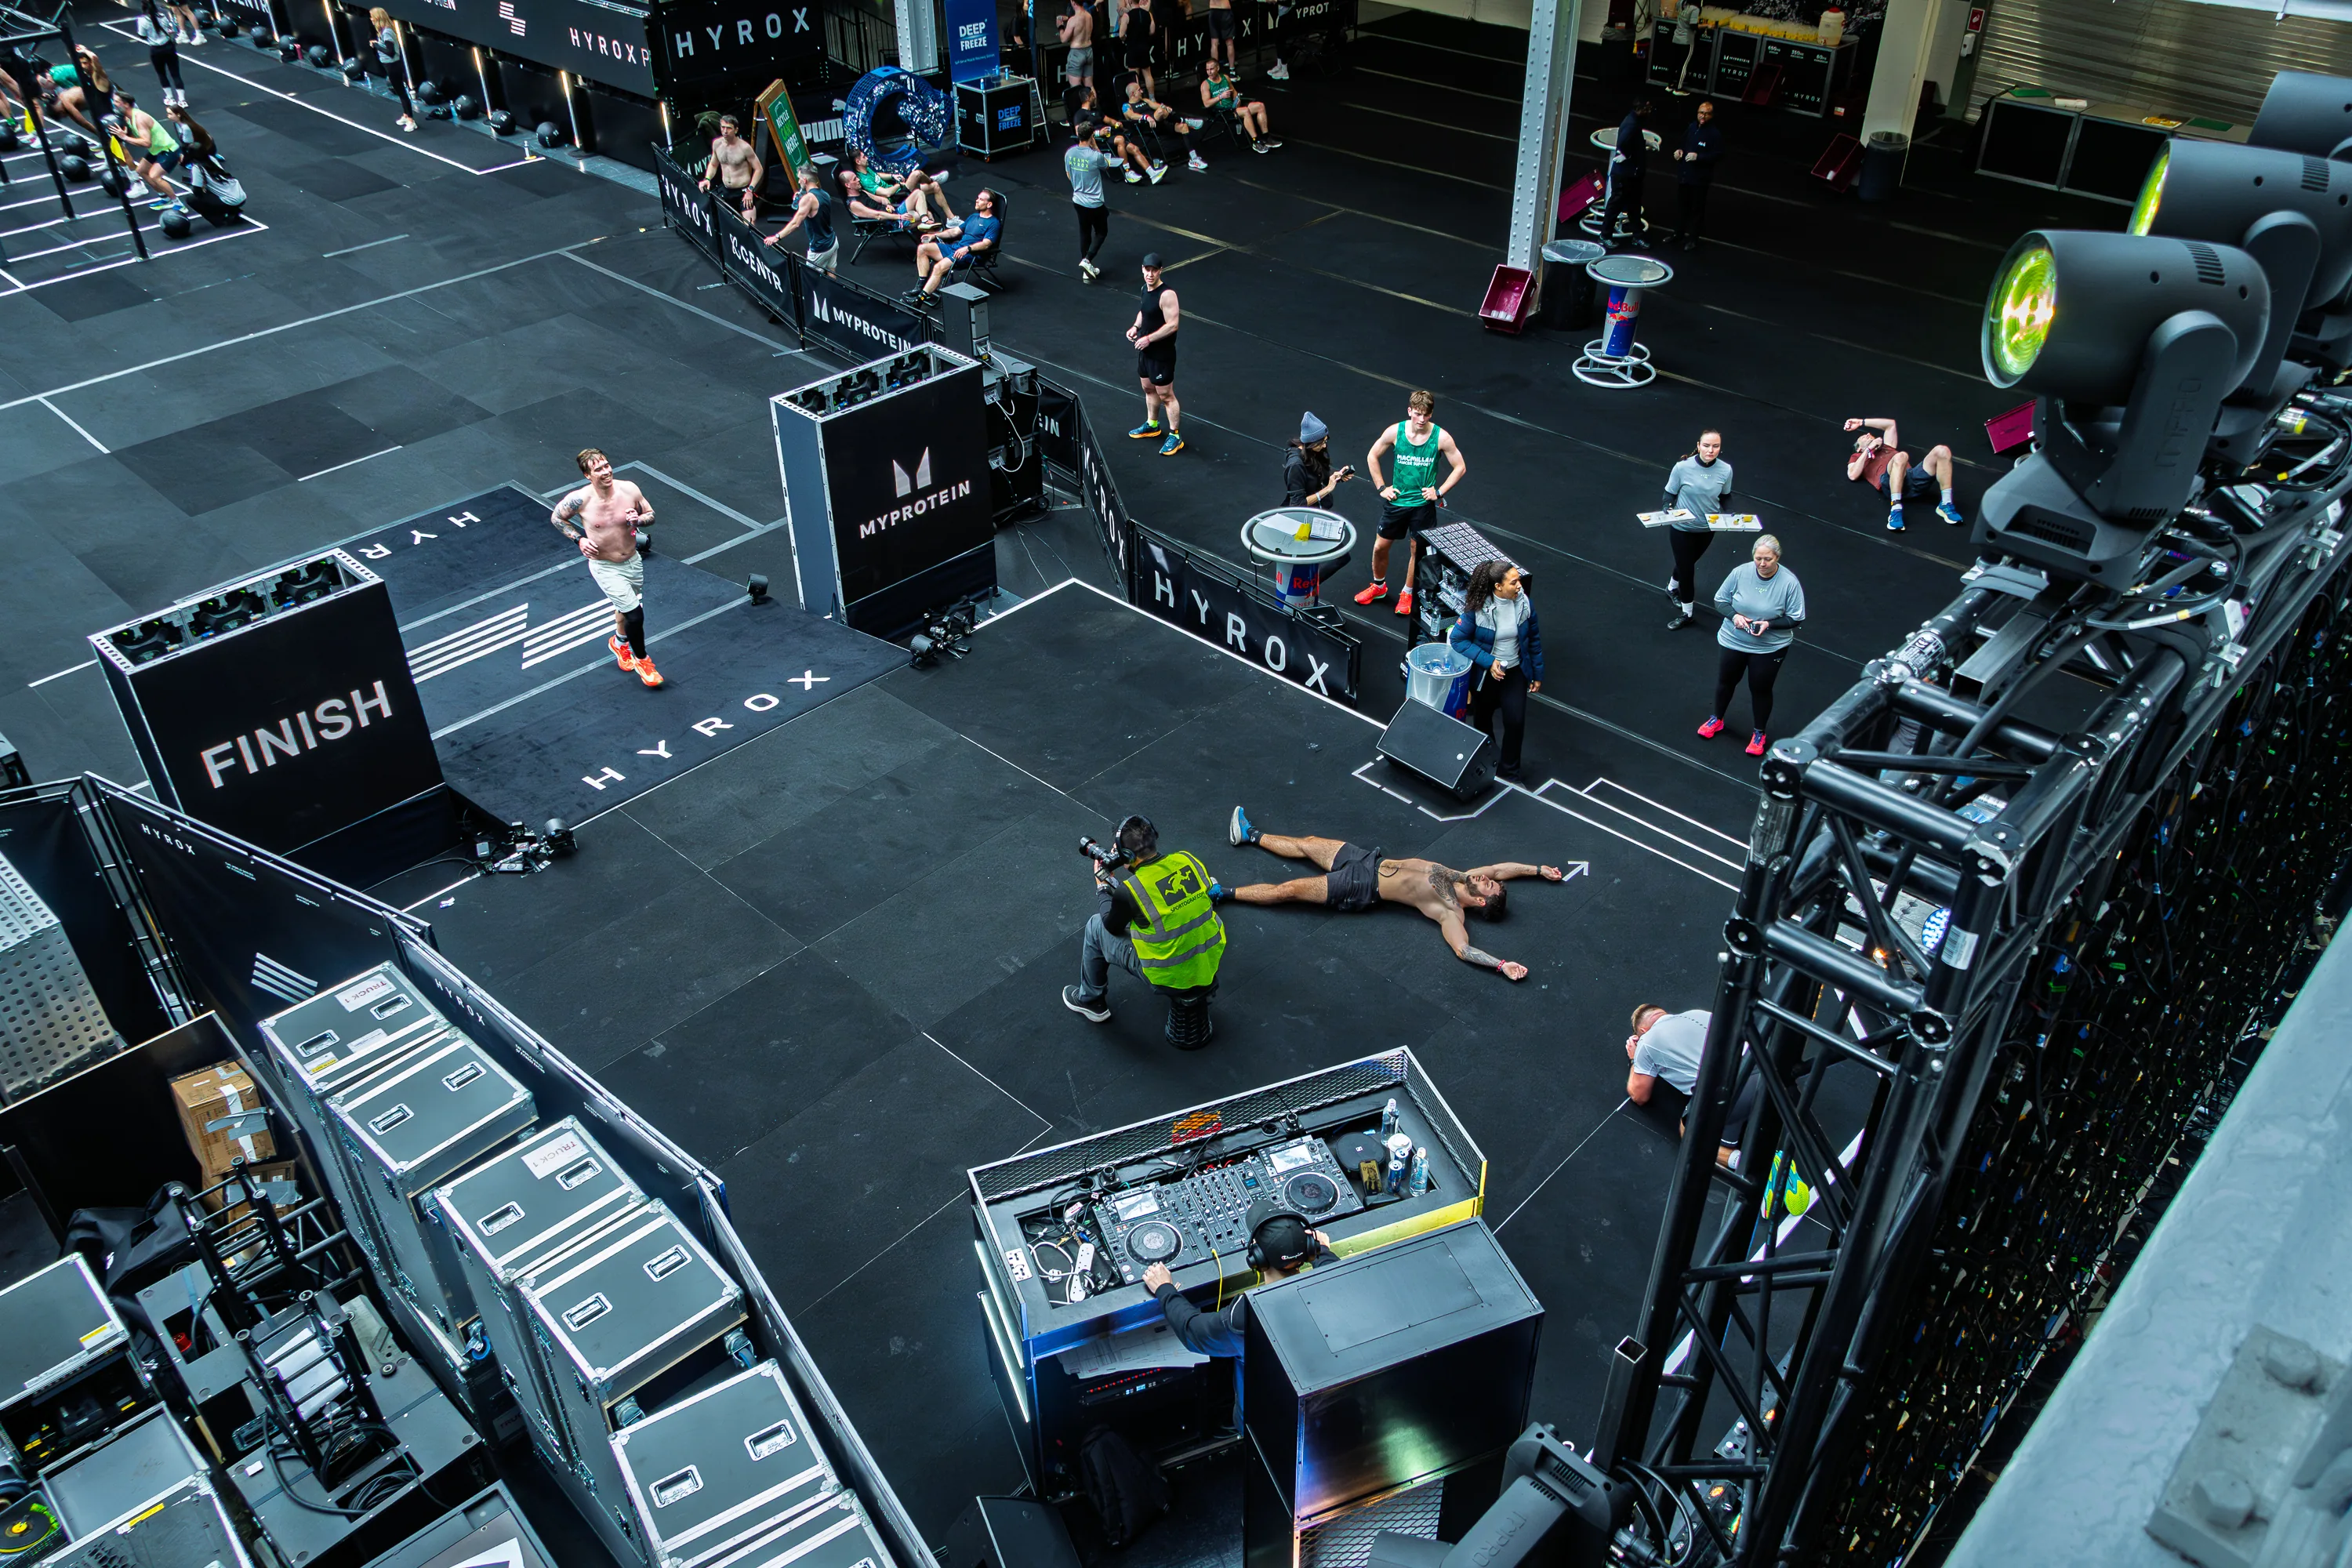
The Venue
HYROX London took place at Olympia London, specifically the Grand Hall. The building has a famous glass barrel-vault roof from 1886 that floods the space with natural light. On paper, this sounded ideal. In practice, HYROX fills the floor with stations, barriers, screens, branded structures, and artificial event lighting that fragments and blocks the natural light from above.
The event was split across two halls. Stations 1 through 7 were in the darker hall on the right. Station 8 (wall balls) and the finish line were in the lighter hall on the left. The lighter hall had more of the glass roof light reaching the floor. The darker hall was noticeably worse, relying more on artificial overhead rigs.
There was also an upstairs balcony with views down onto the race floor. I used this for a few shots but spent most of the time at floor level near the station barriers.
The warmup area was a separate dark room upstairs with its own lighting, completely different from either hall.
Three distinct lighting environments in one event. Each needed different treatment in the colour grade. One Lumetri preset could not cover all three.
Preparation
Camera Presets
The A6700 allows three saved presets in both photo and video mode, six total. I set up three the night before. Photo and video presets are stored separately, so Video 1, 2, 3 and Photo 1, 2, 3 are independent banks.
Video Preset 1: Station Work
| Setting | Value |
|---|---|
| Resolution | 4K (3840x2160) |
| Frame rate | 25fps |
| Shutter speed | 1/50 |
| Aperture | f/5.6 |
| ISO | 400 to 800, adjusted per station |
| White balance | 4800K (tested on arrival) |
| Profile | Cinetone |
| Recording format | XAVC S 4K, 140Mbps, 4:2:2, 10-bit |
| Focus | Continuous AF, Human tracking |
| Focus area | Tracking: Spot Medium |
| Touch tracking | On |
| AF Transition Speed | 5 out of 7 |
| AF Subject Shift Sensitivity | 2 out of 5 |
| IBIS | On |
| ND filter | Off |
| Lens hood | On |
Video Preset 2: Slow Motion
| Setting | Value |
|---|---|
| Frame rate | 50fps |
| Shutter speed | 1/100 |
| Everything else | Same as Preset 1 |
The ISO needed to be slightly higher than Preset 1 because the faster shutter loses a stop of light.
Photo Preset 1: Action Stills
| Setting | Value |
|---|---|
| Shutter speed | 1/800 |
| Aperture | f/4.0 to f/5.6 |
| ISO | Auto, capped at 1600 |
| White balance | 4800K |
| Drive mode | Continuous Hi+ (11fps) |
| Focus | Continuous AF, Human Eye tracking |
| Focus area | Tracking: Spot Medium |
| Touch tracking | On |
| File format | RAW |
ISO Auto cap
Set inMenu > Exposure/Color > ISO > ISO Auto Min/Max. Set the maximum to your desired ceiling. This is a camera-wide setting, not per-preset, so it applies globally.
AF Settings
The autofocus settings were critical for this shoot. Two settings work together to keep focus on Fabio in a crowd.
AF Transition Speed at 5 out of 7
This controls how quickly focus snaps back to the subject after an obstruction passes. Higher means faster reacquisition. At HYROX, other racers and judges constantly cross between me and Fabio. The camera needs to find him again quickly after someone walks through the frame.AF Subject Shift Sensitivity at 2 out of 5
This controls how easily the camera abandons the current subject for something new. Lower means stickier. In a crowd of athletes, I need the camera to hold Fabio stubbornly and not jump to the nearest face. Low sensitivity keeps the lock.
The combination is fast to come back, slow to leave.The camera holds the subject stubbornly (low shift sensitivity) but snaps back quickly when it briefly loses them behind someone (high transition speed). Set this the same across all three presets.
White Balance
I planned to use a grey card on arrival but ended up eyeballing it. I looked at a white wall in the venue, set white balance to 4800K, and it looked neutral. White walls looked white, not blue, not yellow. Locked it across all three presets.
I spoke to a few other camera operators at the event and they were all shooting auto white balance. For photos in RAW, auto is fine because white balance is metadata that can be changed in Lightroom with no quality loss. For video where the white balance is baked into the Cinetone profile, manual is safer. Consistency between clips matters more in a compilation than getting each clip individually perfect.
4800K was a compromise between the natural daylight from the glass roof (around 5200 to 5600K) and the warm artificial event lights on the floor (around 3500 to 4000K). The mix of both landed close to 4800K.
What to look for when setting white balance
Neutral whites and accurate skin tones. White things in the venue should look white, not orange, not blue. Skin should look natural, not washed, not yellow. Neutral on camera. Creative in post.
What to Shoot
HYROX has eight stations in a fixed order. Each station is separated by a 1km run.
| Station | Exercise | Visual potential |
|---|---|---|
| 1 | SkiErg (1000m) | Repetitive. One good clip is enough. |
| 2 | Sled Push (50m) | High. Full body strain. Low angle opportunity. |
| 3 | Sled Pull (50m) | Good. Hands on rope, back engaged. |
| 4 | Burpee Broad Jumps | Good for slow motion. The jump. |
| 5 | Rowing (1000m) | Repetitive. Get the face, move on. |
| 6 | Farmers Carry (200m) | Good. Walking toward or past the camera. |
| 7 | Sandbag Lunges | Good. Lunge with weight on shoulder. |
| 8 | Wall Balls | High. Rhythmic throw and catch. Slow motion. |
| Finish | Crossing the line | The most important moment. |
I could not film every station. As a spectator I was on the sides with limited mobility. Fabio ran 1km between each station which gave me roughly 5 to 7 minutes to reposition. The plan was to pick 4 to 5 stations and commit to them rather than rushing between all eight with shaky footage from each.
Do not leave a station early to reposition
The end of a station is where the strain shows on the face. The last few reps, the final metres. That is the footage. Reposition during the 1km run, not during the station work.
The Warmup Room
The warmup area was a dark room upstairs, separate from the main halls. Fabio was stretching and preparing against a white wall. Good subject isolation but different lighting from everywhere else.
Settings
| Setting | Value |
|---|---|
| Aperture | f/5.6 |
| ISO | Adjusted per clip |
| Shutter | 1/50 (video) |
| White balance | 4800K |
The white wall behind Fabio reflected light onto him which gave soft, even fill. Better lighting than most of the event floor. These clips came out clean and well exposed.
What I Learned
The white wall clips needed a different colour grade from the arena floor footage. The wall was slightly cool and his skin lacked warmth. In Premiere Pro I pushed temperature +10 in Lumetri Color and saturation to 125 to bring his skin back to natural. That became a separate preset, HYROX Warmup, applied to all warmup clips.
One close-up was darker than the rest because the wall was not behind him in that shot. The Lumetri preset got it 90% there. A small individual exposure push matched it to the others.
Key Takeaways
| Lesson | Detail |
|---|---|
| White wall gives good fill light | Reflected light is soft and even. Good for warmup and portrait clips. |
| Different lighting needs different presets | The warmup room, the dark hall, and the light hall all needed separate Lumetri corrections. |
| Saturation at 125 for skin against white | Brings warmth back to skin that looks washed under reflected white light. |
The Arena Floor
The Light Problem
This was the defining challenge of the shoot. Olympia’s glass roof lets in natural light but the HYROX setup blocked and fragmented it. The darker hall where stations 1 through 7 sat was significantly worse than expected. The lighter hall with station 8 and the finish line was better but still indoor artificial light, not Bodrum sunshine.
At f/5.6 (the widest the 18-135mm offers at longer focal lengths) with 1/50 shutter and ISO already climbing, many clips were on the edge of being underexposed. For photos it was worse. At 1/800 shutter speed to freeze action, the ISO cap of 1600 was not enough. Some shots pushed to ISO 5000 to get a usable exposure.
The exposure triangle boxed me in:
| What I wanted | What the light gave me |
|---|---|
| 1/800 shutter to freeze action | Too dark at ISO 1600 cap |
| f/5.6, the widest available at 85 to 135mm | Cannot open wider on this lens |
| ISO capped at 1600 | Would have needed 3200 to 5000 to stay at 1/800 |
I solved it in the moment by dropping the shutter speed on photos. Down to 1/250, sometimes 1/50, to get enough light. That meant accepting motion blur on some action shots. At the time I thought ISO 5000 was unusable and shutter speed was the only variable left to sacrifice.
I was wrong. In Lightroom, the ISO 5000 shots cleaned up with Denoise AI and came out sharper than the 1/50 shots with motion blur. Noise can be fixed in post. Motion blur cannot.
The lesson for next time
Raise the ISO cap to 6400, keep the shutter at 1/800, and fix the noise in Lightroom. Sports and event photographers shoot at ISO 6400 to 12800 regularly. Their gear handles it better with full frame sensors and f/2.8 lenses, but the principle is the same. Shutter speed is sacred for action. ISO is the flexible variable. Noise is a post-production problem.
Touch Tracking in a Crowd
Touch tracking was supposed to solve the focus problem. Tap Fabio on the screen, the camera locks a tracking box on him, and it follows him through the frame. In theory.
In practice, the HYROX floor had hundreds of athletes, judges, and spectators moving simultaneously. The tracking struggled in three situations.
Dense packs of runners
When Fabio was running in a group, the camera sometimes lost him and locked onto another athlete. One clip came back with Fabio blurry and the runners behind him sharp. The camera had focused on the wrong person.Pre-framing static shots
I would frame a station and wait for Fabio to enter, the Bodrum technique. But at HYROX there were always spectators standing in my frame. The camera locked onto whoever was there first. When Fabio entered, the focus stayed on the spectator. He was blurry.Crossing paths
When someone walked between me and Fabio, the tracking could jump to the person crossing.
The AF Subject Shift Sensitivity at 2 helped. The camera was sticky and did not jump easily. But in the densest moments it was not enough.
Tap the torso, not the face
The torso is a bigger target and stays visible even when the subject turns away or looks down during a station. Retap frequently when a crowd is approaching, confirming the lock before they reach the subject.
One clip was beautiful because of the crowd, not despite it. Five people in front of Fabio, all out of focus, and he was sharp behind them. As they moved away, he was gradually revealed. It looked like a planned rack focus shot. It was not. But the depth, the layers, the foreground blur made it one of the best clips of the day.
The Tripod
I brought the tripod and used it. I was the only camera operator at the event with one. Everyone else was handheld.
The tripod worked well for specific situations. Zoomed in to 135mm from the balcony, it kept the frame steady where handheld would have been shaky. For longer holds on a station where Fabio was working, it freed me from fighting the weight of the camera.
But it was not practical for the overall shoot. Moving between stations during Fabio’s 1km runs meant packing the tripod, walking through crowds, finding a new spot, setting up again, all in under 5 minutes. Several times I arrived at a station still assembling the tripod as Fabio was finishing. The tripod slowed me down when speed mattered.
For next time
Handheld for everything on the floor. Tripod only if staying in one position for an extended period, like the balcony.
Filming the Stations
I could not get fully into the stations as a spectator. Close enough to the barriers for good shots, but not the angles a credentialed photographer would get. This was fine. The spectator perspective gave natural-looking footage rather than the hyper-close official event style.
At each station, I filmed the full effort before leaving. The end of a station is where the strain shows on the face. The last few reps of wall balls, the final metres of the sled push. Leaving early to reposition would have meant missing the best footage.
Between stations, Fabio ran 1km. That was my window to move. I picked the next station I could physically reach in time, got there, framed it, and waited for him to arrive.
Following the subject’s movement is intentional camera work. Tracking Fabio as he dipped during lunges, following his throw on wall balls, that is not the same as random panning. The camera is motivated by the subject’s rhythm. This is the correct approach for action where the movement has a pattern.
Shot Types Beyond Static Holds
In Bodrum, 80% of the footage was static holds. Frame the scene, hold still, let life enter and exit. At HYROX, a new type of shot happened instinctively. Tracking Fabio as he dipped during lunges, following his throw on wall balls. The camera moved because the subject moved. That is not the same as random panning. The camera is motivated by the subject’s rhythm.
There are four types of shot based on what the camera does.
| Shot type | Camera position | Camera movement | Good for |
|---|---|---|---|
| Static hold | Fixed | None | Subject enters and exits the frame. 80% of footage. The Bodrum default. |
| Tilt | Fixed position | Up or down | Vertical exercises. Lunges, squats, wall balls, deadlifts, burpees. |
| Pan | Fixed position | Left or right | Subject moving horizontally past you. Running, carries, walking. |
| Track | Moving with subject | Walking alongside | Following someone through a space. Walking shots. Gym filming alongside a lift. |
Static hold is the foundation. Everything from the Bodrum post applies. Frame it, hold still, let the world do the work.
Tilt is what I did on the lunges without thinking. The camera stays planted but pivots vertically to follow the subject’s movement. Fabio dips down, I tilt down. He comes back up, I tilt up. Feet stay planted and IBIS handles the stabilisation. Any exercise with a vertical rhythm suits this.
Pan is the horizontal version. Feet planted, body rotates to follow the subject moving across the frame. The farmers carry where Fabio walks past, or a running section where he jogs by. The camera pivots on the spot to track him left to right or right to left.
Track is where the camera physically moves with the subject. Walking alongside someone, moving forward or backward as they move. This is the hardest to do smoothly handheld because footwork introduces bounce. A gimbal helps here. The walking entrance shots from Bodrum are a basic version of this.
The rule stays the same as Bodrum
The camera movement must be motivated by the subject. If the subject is not moving, the camera is not moving. If they dip, you dip. If they walk past, you follow. The subject leads, the camera responds. Unmotivated camera movement looks amateur. Motivated camera movement looks intentional.
Both tilt and pan keep feet planted, which means IBIS handles the stabilisation and the shots stay smooth. Tracking shots where you walk are a different challenge and need either very disciplined footwork (heel to toe, half speed, knees as shock absorbers) or a gimbal.
For HYROX and gym filming, tilt and pan cover most situations. Track is for when the subject is moving through a space and the moment requires following them.
The Balcony
Upstairs gave a wide view of the arena floor. I used this for one shot: the sled pull from 135mm on the tripod, looking down at the station. This was an f/8 to f/11 scene shot, not a portrait. Everything sharp, the whole floor visible.
The balcony shots are establishing footage for the compilation. They show the scale and atmosphere of the event. Same function as the 18mm wide from Antik Tiyatro looking down at Bodrum.
The balcony is further from the floor lighting. ISO climbed higher here than at floor level. The sled pull shot from the balcony hit ISO 5000 at 135mm f/5.6.
The Finish Line
The finish line was in the lighter hall. I made sure to be there after station 7, set up and ready. Fabio crossed the line and immediately dropped to the floor.
I had one vertical clip of the actual crossing but cropping it to horizontal would have lost too much quality. A vertical frame cropped to 16:9 drops to roughly 1080 pixels wide, then scaled up to 3840 it looks soft. The finish line is the most important moment in the compilation. It needs to be the cleanest footage, not the most compromised.
The horizontal clip of him collapsing on the floor was the better choice. The exhaustion, the relief, lying flat after the effort. That moment tells the story better than the split second of crossing.
Portrait Shots
After the race I took static portrait shots on the balcony in the lighter hall. Strong backlight coming through the glass roof onto the subject. These were the easiest shots of the day. No movement, no tracking, no split-second timing. Just composition and exposure.
ISO was manageable at 640 maximum. Shutter at 1/160. Opened the aperture for compression and played with focal lengths from 50mm to get different framing.
These were for a separate person who asked for photos. Different from Fabio’s action footage. But they confirmed what I already knew from the Murat session in Bodrum: static subjects with good light are straightforward. Action subjects with bad light are a fundamentally different challenge.
Photos vs Video
I switched between video and photo mode during the event. The approach was: video first at each station until I had enough clips, then switch to photo mode for stills. Batching rather than constantly toggling.
The photo settings needed to be completely different from video. Video at 1/50 for motion blur. Photos at 1/800 to freeze action. When I forgot to check the shutter speed after switching modes, I got photos at 1/50 with blurry limbs. Those are not recoverable.
When switching from video to photo mode, the first thing to check is the shutter speed
Make it a physical habit. Flip to photo, glance at shutter, confirm 1/800, then frame the shot.
Continuous Hi+ burst mode at 11fps was the right call for photos. Holding the shutter for 2 to 3 seconds during a sled push gave 20 to 30 frames to choose from. One of those always had the perfect body position, the perfect strain on the face, the perfect moment. Without burst mode, I would have missed most of the good shots.
Key Takeaways
| Lesson | Detail |
|---|---|
| Noise can be fixed, motion blur cannot | ISO 5000 with Denoise AI gave sharper results than 1/50 shutter with clean ISO. Raise the ISO cap next time. |
| f/5.6 is the ceiling, not the floor | The 18-135mm cannot open wider at long focal lengths. A faster lens solves every exposure problem from this shoot. |
| Touch tracking struggles in dense crowds | Retap frequently. Tap the torso not the face. Accept that some clips will miss focus. |
| Pre-framing does not work in a crowd | Spectators fill the frame before the subject arrives. Wait for the subject, then tap and track. |
| Foreground blur adds depth | People walking through the foreground out of focus with the subject sharp behind creates cinematic layers. |
| Tripod slows you down at a moving event | Handheld for mobility. Tripod only for fixed positions like the balcony. |
| Film the full station effort | The best footage is at the end of each station when the strain shows. Do not leave early. |
| Burst shooting saves action photos | 11fps for 2 to 3 seconds. Pick the best frame from 20 options. |
| Check shutter speed after mode switch | 1/50 for video, 1/800 for photos. Forgetting to switch is how you get blurry stills. |
| The finish line is non-negotiable | Be there early, framed, and ready. Whatever else you skip, do not miss this. |
The Edit
Recording Format
I shot at XAVC S 4K, 140Mbps, 4:2:2, 10-bit. This was the upgraded format from Bodrum where I was on 60Mbps, 4:2:0, 8-bit. The difference matters in the edit. The 10-bit colour depth gives more room to push temperature, exposure, and colour adjustments in Lumetri Color without banding or colour stepping. The higher bitrate means fewer compression artefacts in scenes with lots of movement, which at HYROX is every scene.
What is banding?
Visible stepping between colours where there should be a smooth gradient. It looks like lines or bands across areas like sky, skin, or walls. At 8-bit (16 million colours) pushing colour adjustments hard can reveal these steps. At 10-bit (1 billion colours) the transitions stay smooth because there is more colour data between each step.
Premiere Pro Setup
Sequence settings: 3840x2160, 25fps, matching the source footage. Dragging the first clip onto the New Item icon created a matching sequence automatically.
For the 50fps slow motion clips, I right-clicked the clip in the Project panel, went to Modify, Interpret Footage, and changed the frame rate to 25fps. This automatically plays the footage at half speed in the 25fps timeline. Clean slow motion without adjusting speed on the timeline.
Culling
I started with roughly 100 clips. Watched everything once without editing. Sorted into three mental categories: yes, maybe, and no. The yes clips were in focus, well exposed, and captured a clear moment. The maybe clips had something good but also a problem, shaky, slightly out of focus, or awkward framing. The no clips were unusable.
For any clip where I zoomed in or out during recording, I cut it into two clips at the stable sections and deleted the zoom in between. Two clean clips at different focal lengths from the same moment. What looked like a mistake became a focal length series in the edit.
Colour Grading
Three distinct lighting environments meant three Lumetri presets.
HYROX Warmup for the white wall clips upstairs:
| Adjustment | Value |
|---|---|
| Temperature | +10 (to counteract the cool white wall) |
| Saturation | 125 (to bring skin colour back) |
| Highlights | -15 (to tame reflections on his skin) |
| Contrast | +10 |
| S curve | Gentle, shadows down slightly, highlights up slightly |
| Sharpening | 30 to 40 |
| Vignette | -15, midpoint 40, feather 70 |
HYROX Base for the arena floor clips in the darker hall:
| Adjustment | Value |
|---|---|
| Temperature | Checked per clip, mostly left at 4800K |
| Vibrance | +10 |
| Highlights | -15 (overhead arena lights and skin reflections) |
| Contrast | +10 |
| S curve | Gentle |
| Colour Wheels | Shadows pushed very slightly toward teal, highlights very slightly toward warm |
| Sharpening | 20 to 30 |
| Vignette | -15, midpoint 40, feather 70 |
The colour wheels gave the footage its cinematic feel. Teal shadows and warm highlights is a classic cinema grade. The key word is slightly. If you can see blue in the shadows, it is too far. It should feel like a mood, not a filter.
Station 8 and lighter hall clips needed the temperature pushed +10 warmer than the darker hall. The lighter hall had more of the grey industrial tone that showed up cool in the footage. The same temperature adjustment fixed both the photos and the video from that hall.
Saving a Lumetri preset
Click on the clip with the grade you want to save. In Effects Controls, right-click on Lumetri Color and select Save Preset. Name it. To apply, go to Effects panel, open Presets folder, and drag the preset onto other clips.
Matching clips with the Waveform monitor. I used Window > Lumetri Scopes to open the Waveform monitor. This shows brightness from 0 (pure black) at the bottom to 100 (pure white) at the top.
- Skin tones should sit around 55 to 70 IRE on the waveform
- Data spread from 10 to 90 with some peaks touching 95 to 100 from highlights is a well-exposed clip
- A thin trace at 0 to 5 for true blacks is correct, not a problem
- If skin reads below 50, the clip is too dark, push exposure up
- If the bulk of the data is bunched in the bottom third, push exposure up
- If data is flattened along the top at 100, highlights are clipping
For clips where Fabio’s skin was reflecting overhead light and creating hot spots, I pulled highlights down rather than dropping overall exposure. Highlights targets the bright areas without touching the midtones or shadows. The reflections come down while the rest of the image stays correctly exposed.
Trust the waveform over your eye
One clip looked bright because of white surfaces and skin reflections. The waveform showed the bulk of the data was actually clustered at 30 to 40, which is low. My eye was drawn to the bright parts but the overall image was underexposed. Pushing exposure up brought the data into the 45 to 55 range where it belonged.
Photos in Lightroom
The photo edit was simpler. RAW files with auto white balance, corrected in Lightroom.
The ISO 5000 sled pull shot from the balcony was the test. Applied Denoise AI and it cleaned up significantly while keeping detail on Fabio’s face and the rope. After that:
- Gentle S curve on the tone curve
- Clarity +10 to +15 for muscle definition
- Texture +10
- Dehaze +5 to +8 to cut through indoor arena haze
- Vignette at -15, midpoint 40, feather 70
Clarity on skin needs care
On a topless athlete at a fitness event it adds definition to muscles which looks good. Above +20 it makes skin look like leather. +10 to +15 is the range.
The same approach applied to all photos with individual exposure adjustments where needed. Client’s response: “Bro those images look so sick such good quality.”
The Compilation
Music first
Found an Amapiano track on Epidemic Sound. ES_Ama Groove by Say3. 2:37 long, 113 BPM, tagged as Dreamy and Suspense. Amapiano’s rhythmic percussion and building energy suits a fitness compilation. The dreamy, suspense qualities give it a dark cinematic feel without being generic epic trailer music.Mapping the track
Before placing any clips, I listened through the track and noted every drop, beat change, and musical transition. Those timestamps became the cut points.
| Timestamp | Track moment | Footage |
|---|---|---|
| 0:00 to 0:16 | Intro before first drop | Warmup clips. Fabio stretching, getting ready, the venue. |
| 0:16 | First drop | Race starts. Energy shifts. |
| 0:34 | Second drop | A station. Something with effort. |
| 0:51 | Third drop | Another station. Intensity building. |
| 0:53 | Piano comes in | A breath. Close-up of his face. A personal moment between stations. |
| 0:53 to 1:10 | Piano section | Mix of stations and running. Cut to the rhythm. |
| 1:10 | Drop | A hard station. Something explosive. |
| 1:27 | Drop | Another big moment. The race getting tough. |
| 1:41 | Mini drop | A quick detail or transition shot. |
| 2:00 | Drop | The final push. Last station. |
| 2:17 | Final soft drop | The finish line. Fabio on the floor. |
| 2:17 to 2:37 | Wind down, ends with clap | Aftermath. Recovery. The final shot. |
Audio mix. The Amapiano track at -6 dB drives the edit. The video clip audio at -12 dB sits underneath as arena atmosphere. You feel the crowd, the thuds, the buzz of the event without it competing with the music. For specific moments where the crowd was cheering and motivating Fabio, I used audio keyframes to swell the clip audio up to -3 dB and dipped the music slightly. The cheering punches through, then the music returns.
To find the drops visually, make the audio track taller by dragging the bottom edge of the track header downward. The drops appear as visible spikes in the waveform. Press M at each drop to place markers on the timeline. Now the cut points are visible without listening for them.
For the keyframes, hold Cmd and click on the volume line running through an audio clip to add keyframe points. Add four points: one before the swell, two for the louder section, one after. Click each keyframe dot on the timeline, then set the value in Effects Controls under Volume > Level.
The clip order follows energy, not chronology
The viewer does not know the race order. They only feel whether the intensity is building. If a station from early in the race looked more intense than one from later, it went later in the edit. Warmup at the start. Finish line at the end. Everything in between is arranged by energy.
Finishing touches. The timeline from top to bottom:
| Track | Content | Settings |
|---|---|---|
| V3 | Film grain overlay | Soft Light blend mode, 5% opacity |
| V2 | Adjustment layer | Global Lumetri: contrast +5, vibrance +5, gentle S curve |
| V1 | Video clips | Individual Lumetri grades per clip |
The adjustment layer was a subtle unifying polish on top of the individual grades. The film grain overlay from Adobe Stock, a black background with white specks, added texture at 5% opacity. At higher percentages the white specks were visible as flickering. 5% on Soft Light was enough to feel the texture without seeing it.
Film grain
The Adobe Stock overlay at 5% Soft Light was barely visible. Next time, try the built-in Noise effect in Premiere Pro’s Effects panel instead. Apply it to the adjustment layer with a low amount (3 to 5%) for more control without the flickering that external grain overlays can introduce.
Export
One master export at the highest quality. This file gets uploaded everywhere, CloudFront, YouTube, and anywhere else. YouTube recompresses on their end regardless of what is uploaded, so there is no need to make a separate lower quality version.
Master export settings:
| Setting | Value |
|---|---|
| Format | H.264 |
| Resolution | 3840 x 2160 |
| Frame rate | 25fps |
| Bitrate | VBR, 2 pass, target 80 Mbps, max 100 Mbps |
| Render at maximum depth | Yes |
Client clips exported separately. Individual trimmed and colour corrected clips for Fabio to use on TikTok. Full 4K horizontal so he can crop to vertical in CapCut or TikTok’s editor without losing quality. A 4K horizontal frame is 3840x2160. When cropped to 9:16 vertical, the tall strip from the centre is 1080x1920, which is exactly TikTok’s native resolution. No upscaling, no softness. The pixels are already there.
For vertical crops to work, frame the subject in the centre of the horizontal frame during filming
A subject placed on the rule-of-thirds intersection gets cut off when the sides are removed for 9:16. If you know the footage will be cropped to vertical, centre-frame the subject while shooting.
What Comes Next
What I Have
A 2:37 cinematic compilation of Fabio’s HYROX race, graded, mixed, and exported. A set of individual clips delivered to the client. A set of edited action photos. And a full set of lessons about indoor event shooting that outdoor filming could never have taught me.
What I Learned
About indoor event shooting
The light is the enemy, not the friend. Everything I learned in Bodrum about abundant sunlight, ND filters, and f/8 to f/16 does not apply indoors. Indoor events are about gathering light. Open the aperture, raise the ISO, and accept that the kit lens cannot do what a fast prime can.About filming people in action
Static subjects are easy. Moving subjects in a crowd are a different discipline. Touch tracking, burst shooting, anticipating where the subject will be, choosing which station to commit to. The camera skills from Bodrum transferred but the decision-making is completely different.About the edit
Premiere Pro for the first time on a real project. Lumetri Color, waveform monitoring, audio keyframing, adjustment layers, film grain overlays. The Bodrum footage has not been edited yet. This HYROX compilation forced me to learn the post-production pipeline on a deadline because the client wanted his content.About constraints teaching lessons
The kit lens at f/5.6 forced me to discover that high ISO with noise reduction beats slow shutter speed with motion blur. The spectator access forced me to work the angles available rather than getting the perfect position. The single battery forced discipline about when to shoot and when to conserve. Every limitation produced a lesson.
Gear for Next Time
| Item | Why |
|---|---|
| Sigma 18-50mm f/2.8 DC DN | The indoor event lens. f/2.8 across the zoom range gives 2 stops more light than f/5.6. ISO 5000 becomes ISO 1250. Keeps zoom flexibility for framing from behind barriers. |
| External microphone | The on-camera mic picks up everything around me, not Fabio. A wireless lapel or shotgun would capture his voice and the immediate station audio. |
| Gimbal | Research needed. Handheld with IBIS works but a gimbal would smooth out the movement between stations and the floor-level tracking shots. |
Settings for Next Time
| Setting | Change from this shoot |
|---|---|
| ISO Auto cap | 6400, not 1600. Fix noise in Lightroom with Denoise AI. |
| Shutter speed for photos | 1/800 locked. Never drop it for light. |
| Tripod | Leave it. Handheld for mobility. |
| Touch tracking | Tap torso not face. Retap before dense crowds approach. |
The Bigger Picture
In Bodrum I discovered that I am drawn to filming people more than places. At HYROX I filmed a specific person through a specific challenge. The footage is about Fabio’s effort, his strain, his finish. The venue is the stage. He is the performance.
The Bodrum compilation is about a place with people passing through it. The HYROX compilation is about a person with a place around him. Same camera, same lens, completely different films. The outdoor footage taught me to see light and composition. The indoor footage taught me to see effort and emotion. Both matter. Both will get better.
Documented March 2026. Olympia London.